How to Clean Your Laptop the Right Way
Gunk happens! Dust, fingerprints, coffee stains, food crumbs—you name it. If your laptop is starting to look a little worse for wear, don’t worry: a basic cleaning session with supplies you likely already have at home can make it look almost brand new.
In this guide, we’ll walk you through how to safely clean your laptop—from the screen to the keyboard, ports, vents, and beyond—without causing any damage.
First Things First: Gather Your Supplies
You don’t need anything fancy! Most cleaning supplies are simple household items:
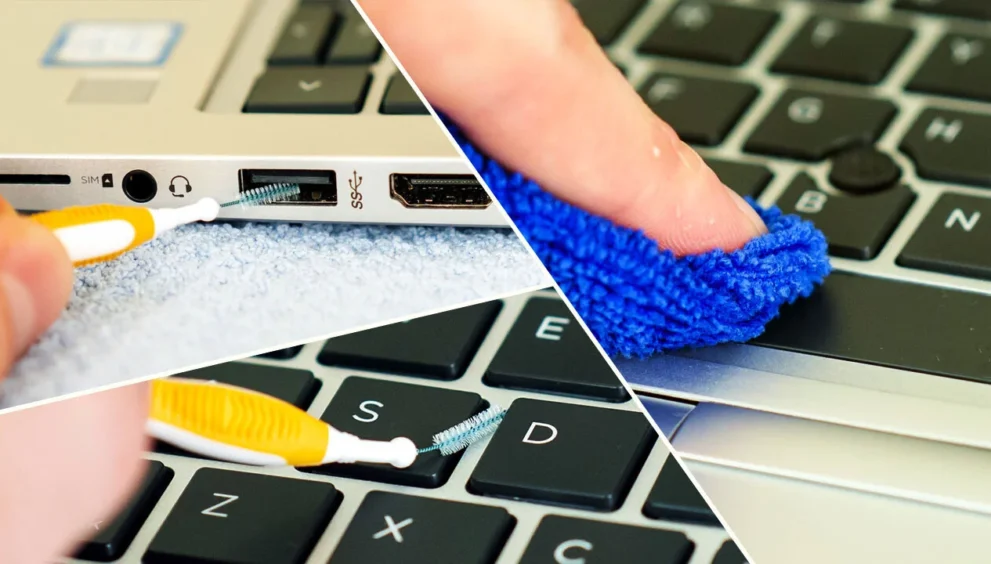
- Microfiber cloth: Essential for wiping surfaces without leaving lint behind. Avoid paper towels or cotton rags, which can scratch or shed fibers.
- Canned air: Perfect for blasting out debris from tight spaces (with a few safety tips we’ll cover later).
- Plastic dental brushes: These tiny tools are great for coaxing crumbs and hair out of keyboards and ports.
- Mild cleaning solutions: Use a 50/50 mix of dish soap and water, distilled water, or white vinegar. For disinfecting, isopropyl alcohol works best.
- Optional: Screen-safe cleaning solutions (like CleanScreen) for the display.
Important:
Avoid ammonia- or bleach-based cleaners—they’re too harsh, especially for screens.
Before you start, turn off and unplug your laptop. Place it on a hard, flat surface with a soft microfiber towel underneath to prevent scratches. If you’re using cleaners or canned air, work in a well-ventilated area. And don’t forget to wash and dry your hands—or wear gloves if you have sensitive skin.
Pro Tips Before You Start
Treat your laptop gently! Here’s how:
- Always lift your laptop with two hands, supporting it from both sides.
- Never pick it up by one corner or by the screen.
- Always close the lid before moving it.
- Keep drinks and liquids well away from your laptop—spills happen fast.
During cleaning, don’t hold the laptop in your hands. Keeping it stationary helps prevent pressure damage and accidents.
Step 1: Blast Away Debris With Canned Air
Start by removing loose dust, hair, and crumbs—especially from the keyboard, vents, and ports.
Using canned air safely:
- Attach the straw nozzle for targeted airflow.
- Hold the can at arm’s length and use short bursts (less than a second).
- Keep a little distance from the surface—never jam the nozzle inside ports or vents.
(Condensation from the can could cause moisture damage if you’re too close.)
Keyboard cleaning tip:
Work from the bottom row upward. Use two quick blasts per key, and approach from different angles to reach stubborn crumbs.
For extra-stubborn debris:
Use the dental brushes to gently loosen particles before blowing them out with canned air. Avoid poking or forcing the brush deep under keys.
Step 2: Wipe and Disinfect the Keyboard
Your keyboard is a magnet for oils, dirt, and germs. Here’s how to clean it properly:
- Lightly dampen a small area of your microfiber cloth with your cleaner of choice (water, vinegar, isopropyl alcohol, or hydrogen peroxide).
- Wipe each key individually to avoid snagging and accidentally pulling off keycaps.
- Make sure the cloth is just slightly damp—not dripping. (Too much moisture can seep inside and cause damage.)
Taking a few extra seconds per key makes a big difference!
Step 3: Clean the Screen, Ports, and Outer Surfaces
For the screen:
Use a clean, dry microfiber cloth first. If needed, lightly dampen it with water or a dedicated screen cleaner. Wipe gently in a circular motion—never press hard.
For the ports and vents:
Use dental brushes and canned air to gently clear dust. Don’t stick anything deep into the ports.
For the outer surfaces:
Wipe down the lid, bottom, and palm rests with a damp microfiber cloth. Follow up with a dry cloth to remove any remaining moisture.
Keep It Clean: Easy Maintenance Tips
- Wipe your keyboard and screen weekly to prevent buildup.
- Regularly use canned air on your vents to avoid overheating.
- Keep food and drinks away to avoid messy accidents.
- Store your laptop in a case when not in use to reduce dust accumulation.
With just 15 minutes and a few household supplies, your laptop will not only look better but also perform better over time. Regular cleaning helps extend its lifespan—and let’s be honest, it’s just satisfying to see it sparkle!